Replacing Step Flashing Behind Siding: How to Document It
Kelvin Spratt
Founder, Supplement Snap · October 25, 2026 · Updated October 26, 2026
Key Takeaways
Old step flashing behind stucco or siding is hard to reuse and hard to explain. How to photograph it, say why it cannot be reused, and log the added labor.
Preparing a supplement? Use the free checklist so nothing is missing when you submit.
The short answer
Step flashing along a sidewall or dormer is often covered by siding, stucco or trim. When the crew opens the junction and finds the old flashing rusted through, bent or missing, the replacement may need extra labor around the wall covering. The way to document it is to photograph the junction, the condition of the metal and the access work, record the length, and write down plainly why the old pieces cannot be reused. The carrier decides what to pay.
Disclosure: we make Supplement Snap, which helps roofing crews document damage found at tear-off and export a report. It does not decide coverage, negotiate claims or guarantee approval. This page is general guidance, not legal or claims advice.
Free download
Roof tear-off findings log
A log for the roof: where each finding is, what it is, how much, and which photos show it, with a checklist before you leave.
Fillable PDF: open it in a PDF reader such as Adobe Acrobat Reader to type into the blanks. Some phone and browser previews cannot.
See all free roofing templates →
No email or sign-up needed. General guidance, not legal advice. Adjust it to your carrier's, client's and state's requirements.
Why this item gets disputed
Flashing behind siding is out of sight, so the original estimate often does not know its condition. A reviewer may also ask whether the existing metal could have been reused, and whether the work behind the siding was necessary. A clear photo and a factual reason answer both questions before they are asked.
| Feature | What to capture |
|---|---|
| The wall | Wide photo of the roof-to-wall junction, showing the siding type and the roof slope |
| The condition | Close photos of rust, holes, lifted pieces or missing sections with a tape |
| The length | Linear feet along the wall, written down |
| Why it cannot be reused | A short factual note: corroded, broken when lifted, or wrong profile for the new roof |
| The access | What had to be cut, lifted or removed to reach it |
Photograph the flashing before it comes out.
Supplement Snap helps your crew capture the condition, location and length of each flashing section while it is exposed. Your first project is free.
Step 1: Show the junction
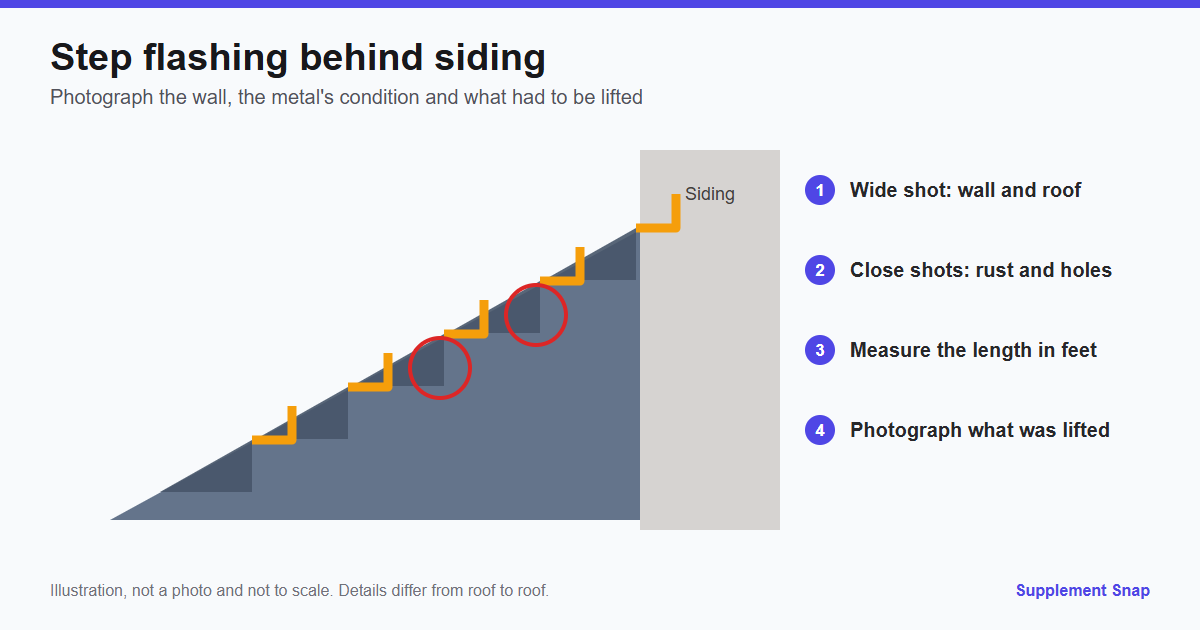
Take a wide photo of the wall where it meets the roof, with the roof slope and the wall covering in the frame. Note which wall it is: left sidewall of the main roof, dormer front, chimney side. Our flashing and vents guide covers the full count of small items.
Step 2: Photograph the condition
Lift or remove only what you need to see it, then photograph the flashing close up with a tape. Rust through, holes, pieces that crumble or lift, and missing sections should each have a close photo. If a piece cannot be reused because it breaks when lifted, photograph it breaking, or photograph the broken piece beside the tape.
Reusing flashing is not always the right call
Some flashing can be reused and some cannot. Photograph its condition and write why you are replacing it. Do not claim it must always be replaced.
Step 3: Record the length and the access
Write the linear feet along the wall. Note what had to be cut, lifted or removed to reach the flashing, such as a section of siding trim, a row of stucco, or a counterflashing. Photograph the access work. The labor to reach and restore the area is part of the finding.
Step 4: Say why it cannot be reused
A short note is enough: Existing step flashing corroded with holes along 22 linear feet. Pieces broke when lifted. Replacement installed to match the new shingle course. Avoid saying it is always required. Local code and the shingle maker's instructions may say how flashing should be installed, so check them. Building codes, manufacturer instructions, policy wording and carrier practice vary, so confirm the details for your job with the building department and the claim documents.
A worked example (fictional)
On a roof with a stucco sidewall, the crew exposes the step flashing along 22 feet and finds holes and crumbling edges. The lead photographs the wall, the metal with a tape, and a piece that breaks in his hand. He notes that a strip of stucco was cut back to reach the flashing and photographs that too.
The office makes one finding for the flashing with the length and photos and a second for the stucco work, so each can be reviewed separately. The numbers are invented for the example.
How to word the request
Step flashing, left sidewall of main roof: 22 linear feet corroded with holes, pieces broke when lifted. Stucco cut back and restored to reach it. Photos 24 to 31 show the wall, condition and access. Replacement and restoration requested.
Separate the flashing from the wall work so the reviewer can say yes or no to each.
Step flashing, counterflashing and kickout flashing
Step flashing: small L-shaped metal pieces, one per shingle course, that run up where a roof meets a wall
Counterflashing: metal installed over the top of the step flashing and into or over the wall to cover the joint
Kickout flashing: a piece at the bottom of a roof-to-wall junction that sends water into the gutter and away from the wall
Name the one you are describing, so the reviewer can match your note to your photo.
Can you replace it without removing the siding?
Sometimes, but not always. It depends on how the wall is covered and how the old flashing was installed. Some installers lift or cut a strip of siding or trim to reach the metal, and some work with the wall covering in place. The right method follows the siding maker's guidance, the shingle and flashing manufacturers' instructions, and local code. Whatever you did, photograph it and write it down, because the access work is part of the finding.
A copy-and-paste checklist
Wide photo of the roof-to-wall junction and which wall it is
Close photos of rust, holes, lifted or missing sections with a tape
Linear feet along the wall, written down
A photo of a piece that breaks when lifted, if that is why it cannot be reused
Photos of anything cut, lifted or removed to reach it
A short note on why you are replacing it
The siding or trim type
When reuse is reasonable
Old flashing in good condition, with the right profile for the new shingle courses, can sometimes be reused. If yours is sound, say so, and do not claim it needs replacing. A reviewer who sees honest notes on the good pieces is more likely to trust your notes on the bad ones. Building codes, manufacturer instructions, policy wording and carrier practice vary, so confirm the details for your job with the building department and the claim documents.
Mistakes to avoid
Removing flashing before photographing the condition
Saying it can never be reused
Lumping flashing and siding work into one line
No length or wall noted
No photos of what was cut or lifted
Frequently asked questions
Can step flashing be reused?
Sometimes. It depends on its condition and the new roofing. Photograph it and write why you are replacing it.
Does insurance pay to replace flashing behind siding?
It depends on the policy and the carrier's review. Document the condition, length and access work and ask.
Do I need to remove the siding?
Only as much as needed to reach and replace the flashing properly, following the manufacturer's instructions and local code. Photograph what you did.
How do I measure step flashing?
In linear feet along the wall. Write the length and note which wall.
Should I separate flashing from siding work?
Yes. Separate findings are easier for a reviewer to approve or question.
What if the old flashing looks fine?
Say so honestly. If it can be reused, the reviewer may reasonably ask for that, and exaggerating hurts your other findings.
Can you replace step flashing without removing siding?
Sometimes. It depends on the wall covering and how the flashing was installed. Follow the manufacturers' instructions and local code, and document whatever access work you do.
What is a kickout flashing?
A piece at the bottom of a roof-to-wall junction that directs water into the gutter and away from the wall. A missing or poorly placed one is something to photograph.
How do I know if step flashing needs replacing?
Look for rust through, holes, pieces that are bent, lifted or missing, and metal that crumbles or breaks when touched. Photograph each with a tape and write what you saw.
References & Resources
Free tools and resources
Ready to streamline your supplement process?
Supplement Snap helps your crew capture hidden damage during tear-off and generate adjuster-ready reports in minutes.
Written by
Kelvin Spratt
Founder, Supplement Snap
Kelvin builds software for roofing contractors who are tired of leaving supplement money on the table. His background in software development and insurance restoration workflows drives everything Supplement Snap does.
More Articles
Flashing, Vents and Pipe Jacks: Documenting Small Items on a Roof Claim
Read more →
What Can You Supplement on a Roof Claim? 12 Items Contractors Commonly Request
Read more →
How to Document Rotted Roof Decking Found During Tear-Off
Read more →
Code Upgrades in Roofing Claims: Ordinance and Law Coverage Explained
Read more →